reuse, reuse, ecyc e
I’m writing this post to document the process I took to make an iMac into a WeatherStar4000+ appliance.
I had an iMac sitting around not really doing anything. It has what Apple called a “Fusion Drive”, which is a very slow 1TB 5,400 RPM HDD paired with a smaller SSD for caching. Allegedly, some models were shipped with a 128 GB SSD, but this one came with a much more modest 32 GB. I see reports online that some even came with 24 GB! The SSD is just used to cache files, both of the drives together were presented to the user as one drive so they don’t have to make decisions on where files should go.
Trying to install macOS from internet recovery fails, as does installing from USB. Being a 2017 model, this computer is nine years old at time of writing. I’m fairly certain the HDD is failing, and that’s why the install is not working. However, installing Linux on that SSD seems to work just fine! While unsure of what to do with it, I came across this project which creates a replica of the old local forecasts on The Weather Channel. I immediately knew what I wanted to do, make an appliance that shows this screen 24/7.
Step 1: Install OS, get non-free drivers
I did a minimal install of Debian Trixie, enabling nothing but standard system utilities and sshd. We will need to connect via ethernet and get non-free enabled to get the firmware to make the broadcom wifi work.
Open the sources list:
sudo nano /etc/apt/sources.list
Replace the contents with:
deb http://deb.debian.org/debian trixie main contrib non-free non-free-firmware
deb http://deb.debian.org/debian-security trixie-security main contrib non-free non-free-firmware
deb http://deb.debian.org/debian trixie-updates main contrib non-free non-free-firmware
Then update and upgrade:
sudo apt update && sudo apt upgrade -y
Then we can install the firmware we need, remove conflicting drivers, and load the Broadcom wl driver:
sudo apt install -y broadcom-sta-dkms wireless-tools wpasupplicant

sudo modprobe -r b43 bcma brcmsmac ssb

sudo modprobe wl
Shrimple enough.
Step 2: Log In and configure WiFi
Once the drivers are installed, we need to actually configure a WiFi connection. For ease of administration, I’m using NetworkManager:
sudo apt install -y network-manager
sudo systemctl enable NetworkManager
sudo systemctl start NetworkManager
Once that’s installed, use the TUI to connect:
sudo nmtui
Test it:
ping -c 5 google.com
Check your network interfaces:
ip addr
Make note of the computer’s IP. This is what it looks like on my machine:
weatherstar@weatherstar:~$ ip addr
1: lo: <LOOPBACK,UP,LOWER_UP> mtu 65536 qdisc noqueue state UNKNOWN group default qlen 1000
    link/loopback 00:00:00:00:00:00 brd 00:00:00:00:00:00
    inet 127.0.0.1/8 scope host lo
       valid_lft forever preferred_lft forever
    inet6 ::1/128 scope host noprefixroute
       valid_lft forever preferred_lft forever
2: enp4s0f0: <BROADCAST,MULTICAST> mtu 1500 qdisc noop state DOWN group default qlen 1000
    link/ether 78:7b:8a:dd:af:20 brd ff:ff:ff:ff:ff:ff
    altname enx787b8addaf20
3: wlp3s0: <BROADCAST,MULTICAST,UP,LOWER_UP> mtu 1500 qdisc fq_codel state UP group default qlen 1000
    link/ether 14:20:5e:07:a8:16 brd ff:ff:ff:ff:ff:ff
    altname wlx14205e07a816
    inet 192.168.1.169/24 brd 192.168.1.255 scope global dynamic noprefixroute wlp3s0
       valid_lft 28442sec preferred_lft 20976sec
    inet6 2603:6010:2d00:995d::1ef3/128 scope global dynamic noprefixroute
       valid_lft 452337sec preferred_lft 452337sec
    inet6 2603:6010:2d00:995d:3600:757f:8ff8:47f3/64 scope global dynamic mngtmpaddr noprefixroute
       valid_lft 604785sec preferred_lft 604785sec
    inet6 fe80::b7b8:786b:ad72:c6f1/64 scope link
       valid_lft forever preferred_lft forever
That’s a lot to look at! The important information here is inet 192.168.1.169/24 underneath 3: wlp3s0:.
From here, we can remove the mouse and keyboard from the machine and do the rest of the install via SSH after it has been placed where it will display the weather.
Step 3: Install Docker
There are plenty of public ws4k instances, but I figured it would be easy enough to run it locally using docker. Install the needed tools:
sudo apt install -y docker.io docker-compose
sudo systemctl enable docker
sudo usermod -aG docker weatherstar
Interesting note here: We added our weatherstar user to the docker group, but our current login session already has a fixed set of groups baked in from when we logged in. The kernel doesn’t retroactively update a running session, so we can just log out and back in for the group changes to take effect:
exit
Once we’re logged back in, we’re ready to administer docker.
Step 4: Set Up WS4K+
An image exists for WS4K+ on the GitHub Container Repository, so to get the WS4K+ service going, we just need to create a compose file and a directory for it and all of the other data for WS4K+:
mkdir ~/weatherstar && cd ~/weatherstar
Create a file called docker-compose.yml and open it with your text editor of choice.
Fill it with the following, replacing Hell, MI, USA with your actual location:
services:
  ws4kp:
    image: ghcr.io/netbymatt/ws4kp
    container_name: ws4kp
    environment:
      - WSQS_latLonQuery=Hell, MI, USA
      - WSQS_current_weather_checkbox=true
      - WSQS_local_forecast_checkbox=true
      - WSQS_extended_forecast_checkbox=true
      - WSQS_radar_checkbox=true
      - WSQS_settings_kiosk_checkbox=true
    ports:
      - 8080:8080
    restart: unless-stopped
Start the container:
docker compose up -d
You can use docker ps to check if it’s running. We are looking for a status of (healthy).
Step 5: Install the Graphical Stack
Now that WS4K+ is running, we need to be able to display it. Let’s install everything we need:
sudo apt install -y \
  xorg \
  openbox \
  lightdm \
  chromium \
  unclutter \
  x11-xserver-utils
We’re going to use xorg for our display server here, just to keep things simple.
Chromium’s kiosk mode is great, so we’re definitely using that.
LightDM is a lightweight display manager that will enable automatic login.
Openbox is a very lightweight window manager that will let us run a script to open Chromium in kiosk mode.
Unclutter will let us make the mouse disappear. Without it, there would be a cursor in the middle of the screen.
x11-xserver-utils contains xset, which we will use to stop the screen from going to sleep.
Step 6: Configure Auto-Login
Speaking of automatic login, let’s take care of that next. Open /etc/lightdm/lightdm.conf with your favourite text editor as superuser. Fill it in with:
[Seat:*]
autologin-user=weatherstar
autologin-user-timeout=0
user-session=openbox
It’s really that easy. Thanks, LightDM!
Step 7: Create the Kiosk Script
Next, we need to make the script that Openbox will call upon login. Maybe with your least favourite text editor this time, create and open ~/kiosk.sh
#!/bin/bash

xset s off
xset -dpms
xset s noblank

unclutter -idle 0.5 -root &

sleep 10

sed -i 's/"exited_cleanly":false/"exited_cleanly":true/' \
  ~/.config/chromium/Default/Preferences 2>/dev/null
sed -i 's/"exit_type":"Crashed"/"exit_type":"Normal"/' \
  ~/.config/chromium/Default/Preferences 2>/dev/null

chromium \
  --kiosk \
  --noerrdialogs \
  --disable-infobars \
  --no-first-run \
  --autoplay-policy=no-user-gesture-required \
  --disable-session-crashed-bubble \
  --incognito \
  http://localhost:8080
That’s quite a bit! The xset commands disable screen saver, disable Display Power Management Signaling, and stops X from blanking the screen.
Unclutter is told to hide the mouse if no movement is detected for half a second (-idle 0.5),
even if it’s not over a window (-root). We aren’t finished with the script, so we need to run it in the background with &.
At this point, we need to run Chromium, but if we try to load the page before the docker container is finished starting, we will just get an error page.
We simply wait (sleep) for 10 seconds to avoid this.
We also need to avoid Chromium’s crash detection. When Chromium doesn’t exit cleanly, like during a power outage or reboot, next launch comes with a “Chromium didn’t shut down correctly” bubble, which we definitely don’t want in a kiosk / appliance like this.
It’s a bit of a bodge, but to avoid this, we issue two sed commands to
look at Chromium’s preferences file and rewrite some flags to say everything was fine.
There’s probably a more elegant way to do this, but I’m not aware of it.
After all that preparation, we finally launch Chromium!
--kiosk gives us a true fullscreen display, no title bar, no way to exit with a mouse.
--noerrdialogs suppresses runtime error / crash popups.
--disable-infobars hides “running in automation” style banners.
--no-first-run skips the welcome / setup screen.
--autoplay-policy=no-user-gesture-required is an attempt to make audio play automatically. It’s not working for me, but I’d like to fix this in the future.
--disable-session-crashed-bubble Maybe not needed, but I really don’t want to see that crash restore prompt, ever.
--incognito yet another layer of protection against crash restore prompts. Incognito mode doesn’t use or write to the normal session state, so the crash-recovery banner should never appear.
Finally, we tell Chromium what page to open to, the WS4K+ server we set up earlier on port 8080.
Make it executable:
chmod +x ~/kiosk.sh
Next, we have to tell Openbox to run this at start.
Step 8: Configure Openbox Autostart
Openbox can be configured to run a command at boot if you put a file called autostart into its .config folder. Create the folder:
mkdir -p ~/.config/openbox
Open ~/.config/openbox/autostart with a text editor. Add this line:
/home/weatherstar/kiosk.sh &
Shrimple enough.
Step 9: Enable Graphical Boot
Finally, We now need LightDM to run at boot, so we will enable it.
sudo systemctl enable lightdm
sudo systemctl set-default graphical.target
You’ll notice a second command there. If we rebooted now we would still be presented with a simple text mode login prompt.
We need to change from Debian’s default boot target, which is multi-user.target, to graphical.target.
Step 10: Reboot
sudo reboot
At this point, the computer should reboot and your Weather Star 4000+ kiosk should be ready!
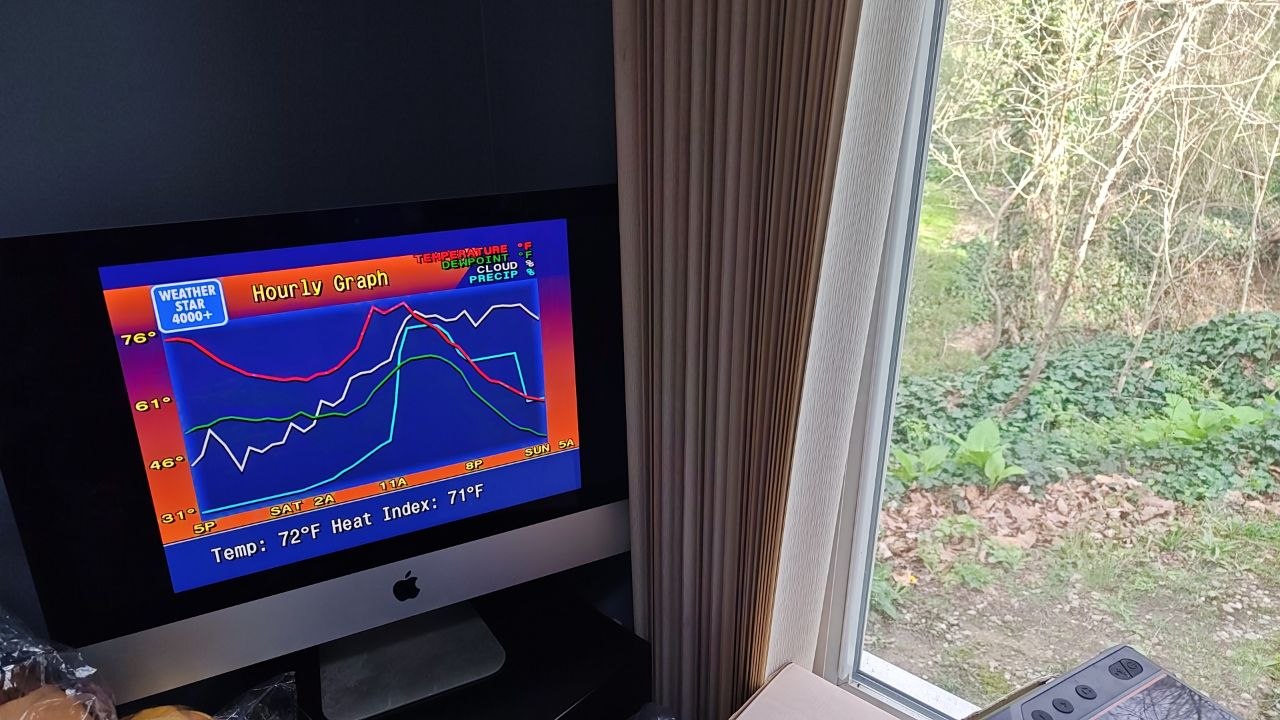
I really like how this came out!